Draft Board
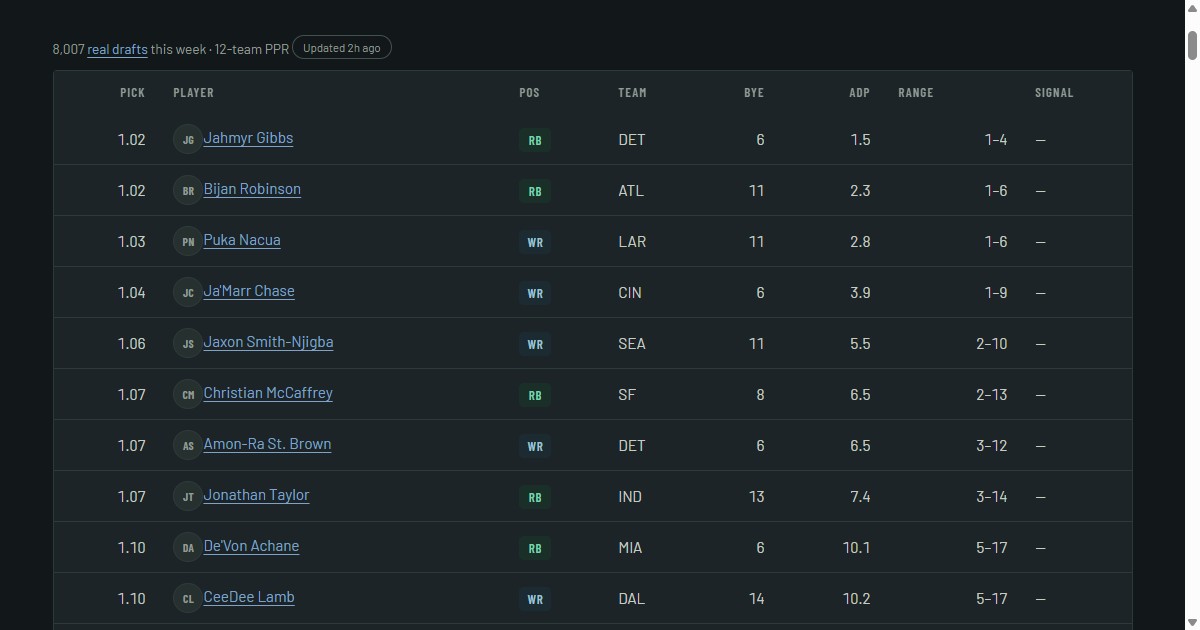
| Pick | Player | Pos | Team | Bye | ADP | Range | Signal | ||
|---|---|---|---|---|---|---|---|---|---|
| 1.02 | Jahmyr GibbsRB · DET | RB | DET | 6 | 1.6 | 1–3 | — | RBPosition DETTeam 6Bye 1–3Range —Signal | |
| 1.02 | Bijan RobinsonRB · ATL | RB | ATL | 11 | 1.7 | 1–3 | — | RBPosition ATLTeam 11Bye 1–3Range —Signal | |
| 1.04 | Ja'Marr ChaseWR · CIN | WR | CIN | 6 | 4 | 1–7 | — | WRPosition CINTeam 6Bye 1–7Range —Signal | |
| 1.05 | Christian McCaffreyRB · SF | RB | SF | 8 | 4.7 | 3–6 | — | RBPosition SFTeam 8Bye 3–6Range —Signal | |
| 1.05 | Jaxon Smith-NjigbaWR · SEA | WR | SEA | 11 | 5.4 | 3–7 | — | WRPosition SEATeam 11Bye 3–7Range —Signal | |
| 1.07 | Amon-Ra St. BrownWR · DET | WR | DET | 6 | 6.7 | 4–9 | — | WRPosition DETTeam 6Bye 4–9Range —Signal | |
| 1.08 | Jonathan TaylorRB · IND | RB | IND | 13 | 8.2 | 4–11 | — | RBPosition INDTeam 13Bye 4–11Range —Signal | |
| 1.10 | De'Von AchaneRB · MIA | RB | MIA | 6 | 9.7 | 8–12 | — | RBPosition MIATeam 6Bye 8–12Range —Signal | |
| 1.10 | CeeDee LambWR · DAL | WR | DAL | 14 | 10.3 | 8–12 | — | WRPosition DALTeam 14Bye 8–12Range —Signal | |
| 1.12 | Justin JeffersonWR · MIN | WR | MIN | 6 | 12.2 | 10–14 | — | WRPosition MINTeam 6Bye 10–14Range —Signal | |
| 2.01 | James CookRB · BUF | RB | BUF | 7 | 12.7 | 8–17 | — | RBPosition BUFTeam 7Bye 8–17Range —Signal | |
| 2.01 | Derrick HenryRB · BAL | RB | BAL | 13 | 12.8 | 4–19 | — | RBPosition BALTeam 13Bye 4–19Range —Signal | |
| 2.01 | Chase BrownRB · CIN | RB | CIN | 6 | 13.2 | 10–16 | — | RBPosition CINTeam 6Bye 10–16Range —Signal | |
| 2.04 | Rashee RiceWR · KC | WR | KC | 5 | 15.5 | 11–19 | Reach | WRPosition KCTeam 5Bye 11–19Range ReachSignal | |
| 2.04 | George PickensWR · DAL | WR | DAL | 14 | 16.3 | 13–23 | Reach | WRPosition DALTeam 14Bye 13–23Range ReachSignal | |
| 2.05 | A.J. BrownWR · NE | WR | NE | 11 | 16.6 | 12–20 | Reach | WRPosition NETeam 11Bye 12–20Range ReachSignal | |
| 2.05 | Saquon BarkleyRB · PHI | RB | PHI | 10 | 16.7 | 10–24 | — | RBPosition PHITeam 10Bye 10–24Range —Signal | |
| 2.06 | Chris OlaveWR · NO | WR | NO | 8 | 17.8 | 15–19 | — | WRPosition NOTeam 8Bye 15–19Range —Signal | |
| 2.08 | Nico CollinsWR · HOU | WR | HOU | 8 | 20.3 | 17–26 | — | WRPosition HOUTeam 8Bye 17–26Range —Signal | |
| 2.10 | Ashton JeantyRB · LV | RB | LV | 13 | 22.4 | 18–26 | — | RBPosition LVTeam 13Bye 18–26Range —Signal | |
| 2.11 | Omarion HamptonRB · LAC | RB | LAC | 7 | 22.7 | 14–31 | — | RBPosition LACTeam 7Bye 14–31Range —Signal | |
| 2.11 | Kenneth Walker IIIRB · KC | RB | KC | 5 | 22.9 | 18–27 | — | RBPosition KCTeam 5Bye 18–27Range —Signal | |
| 3.03 | DeVonta SmithWR · PHI | WR | PHI | 10 | 26.5 | 23–32 | Reach | WRPosition PHITeam 10Bye 23–32Range ReachSignal | |
| 3.04 | Malik NabersWR · NYG | WR | NYG | 8 | 27.6 | 24–33 | — | WRPosition NYGTeam 8Bye 24–33Range —Signal | |
| 3.05 | Javonte WilliamsRB · DAL | RB | DAL | 14 | 28.9 | 21–37 | — | RBPosition DALTeam 14Bye 21–37Range —Signal | |
| 3.06 | Trey McBrideTE · ARI | TE | ARI | 14 | 29.6 | 14–41 | — | TEPosition ARITeam 14Bye 14–41Range —Signal | |
| 3.06 | Josh AllenQB · BUF | QB | BUF | 7 | 30.1 | 1–44 | — | QBPosition BUFTeam 7Bye 1–44Range —Signal | |
| 3.08 | Tetairoa McMillanWR · CAR | WR | CAR | 5 | 32.3 | 30–35 | — | WRPosition CARTeam 5Bye 30–35Range —Signal | |
| 3.08 | Emeka EgbukaWR · TB | WR | TB | 10 | 32.4 | 19–40 | Reach | WRPosition TBTeam 10Bye 19–40Range ReachSignal | |
| 3.10 | Tee HigginsWR · CIN | WR | CIN | 6 | 33.5 | 30–36 | Reach | WRPosition CINTeam 6Bye 30–36Range ReachSignal | |
| 3.10 | Brock BowersTE · LV | TE | LV | 13 | 34.4 | 2–43 | — | TEPosition LVTeam 13Bye 2–43Range —Signal | |
| 3.11 | Kyren WilliamsRB · LAR | RB | LAR | 11 | 34.7 | 27–37 | Value | RBPosition LARTeam 11Bye 27–37Range ValueSignal | |
| 3.12 | Cam SkatteboRB · NYG | RB | NYG | 8 | 36.2 | 24–43 | Value | RBPosition NYGTeam 8Bye 24–43Range ValueSignal | |
| 3.12 | Travis EtienneRB · NO | RB | NO | 8 | 36.4 | 33–41 | Value | RBPosition NOTeam 8Bye 33–41Range ValueSignal | |
| 4.04 | Ladd McConkeyWR · LAC | WR | LAC | 7 | 39.7 | 30–48 | — | WRPosition LACTeam 7Bye 30–48Range —Signal | |
| 4.06 | D'Andre SwiftRB · CHI | RB | CHI | 10 | 41.5 | 37–48 | Value | RBPosition CHITeam 10Bye 37–48Range ValueSignal | |
| 4.10 | Jameson WilliamsWR · DET | WR | DET | 6 | 45.8 | 40–48 | — | WRPosition DETTeam 6Bye 40–48Range —Signal | |
| 4.10 | DJ MooreWR · BUF | WR | BUF | 7 | 46.1 | 36–58 | Reach | WRPosition BUFTeam 7Bye 36–58Range ReachSignal | |
| 4.10 | Jaylen WaddleWR · DEN | WR | DEN | 10 | 46.4 | 34–58 | — | WRPosition DENTeam 10Bye 34–58Range —Signal | |
| 4.11 | Terry McLaurinWR · WAS | WR | WAS | 7 | 47.4 | 37–52 | — | WRPosition WASTeam 7Bye 37–52Range —Signal | |
| 4.12 | Quinshon JudkinsRB · CLE | RB | CLE | 11 | 48 | 27–57 | Value | RBPosition CLETeam 11Bye 27–57Range ValueSignal | |
| 5.02 | Joe BurrowQB · CIN | QB | CIN | 6 | 49.7 | 41–57 | Reach | QBPosition CINTeam 6Bye 41–57Range ReachSignal | |
| 5.02 | Bucky IrvingRB · TB | RB | TB | 10 | 50 | 45–54 | Value | RBPosition TBTeam 10Bye 45–54Range ValueSignal | |
| 5.03 | Lamar JacksonQB · BAL | QB | BAL | 13 | 51.2 | 41–64 | Reach | QBPosition BALTeam 13Bye 41–64Range ReachSignal | |
| 5.06 | Mike EvansWR · SF | WR | SF | 8 | 53.7 | 47–66 | — | WRPosition SFTeam 8Bye 47–66Range —Signal | |
| 5.06 | Christian WatsonWR · GB | WR | GB | 11 | 53.9 | 42–71 | Reach | WRPosition GBTeam 11Bye 42–71Range ReachSignal | |
| 5.06 | David MontgomeryRB · HOU | RB | HOU | 8 | 54.4 | 46–60 | Value | RBPosition HOUTeam 8Bye 46–60Range ValueSignal | |
| 5.09 | Colston LovelandTE · CHI | TE | CHI | 10 | 57.2 | 43–67 | — | TEPosition CHITeam 10Bye 43–67Range —Signal | |
| 5.09 | Bhayshul TutenRB · JAX | RB | JAX | 7 | 57.2 | 52–67 | Value | RBPosition JAXTeam 7Bye 52–67Range ValueSignal | |
| 5.09 | Rome OdunzeWR · CHI | WR | CHI | 10 | 57.4 | 44–72 | — | WRPosition CHITeam 10Bye 44–72Range —Signal | |
| 5.12 | Jaylen WarrenRB · PIT | RB | PIT | 9 | 60.1 | 57–64 | Value | RBPosition PITTeam 9Bye 57–64Range ValueSignal | |
| 6.01 | Courtland SuttonWR · DEN | WR | DEN | 10 | 60.6 | 57–69 | — | WRPosition DENTeam 10Bye 57–69Range —Signal | |
| 6.03 | Parker WashingtonWR · JAX | WR | JAX | 7 | 62.9 | 50–70 | Reach | WRPosition JAXTeam 7Bye 50–70Range ReachSignal | |
| 6.04 | Marvin Harrison Jr.WR · ARI | WR | ARI | 14 | 63.7 | 50–73 | — | WRPosition ARITeam 14Bye 50–73Range —Signal | |
| 6.06 | DK MetcalfWR · PIT | WR | PIT | 9 | 66.2 | 50–74 | — | WRPosition PITTeam 9Bye 50–74Range —Signal | |
| 6.06 | Tyler WarrenTE · IND | TE | IND | 13 | 66.2 | 44–85 | — | TEPosition INDTeam 13Bye 44–85Range —Signal | |
| 6.06 | Jadarian PriceRB · SEA | RB | SEA | 11 | 66.2 | 54–74 | Value | RBPosition SEATeam 11Bye 54–74Range ValueSignal | |
| 6.07 | Tony PollardRB · TEN | RB | TEN | 9 | 66.6 | 60–79 | Value | RBPosition TENTeam 9Bye 60–79Range ValueSignal | |
| 6.10 | Alec PierceWR · IND | WR | IND | 13 | 70.4 | 65–78 | Reach | WRPosition INDTeam 13Bye 65–78Range ReachSignal | |
| 7.01 | Michael WilsonWR · ARI | WR | ARI | 14 | 73.4 | 62–80 | Reach | WRPosition ARITeam 14Bye 62–80Range ReachSignal | |
| 7.03 | Jalen HurtsQB · PHI | QB | PHI | 10 | 74.7 | 64–84 | — | QBPosition PHITeam 10Bye 64–84Range —Signal | |
| 7.03 | Rico DowdleRB · PIT | RB | PIT | 9 | 75 | 63–87 | Value | RBPosition PITTeam 9Bye 63–87Range ValueSignal | |
| 7.03 | Chuba HubbardRB · CAR | RB | CAR | 5 | 75 | 65–84 | Value | RBPosition CARTeam 5Bye 65–84Range ValueSignal | |
| 7.04 | Chris Godwin Jr.WR · TB | WR | TB | 10 | 76.2 | 61–90 | Reach | WRPosition TBTeam 10Bye 61–90Range ReachSignal | |
| 7.05 | Caleb WilliamsQB · CHI | QB | CHI | 10 | 76.7 | 44–98 | Reach | QBPosition CHITeam 10Bye 44–98Range ReachSignal | |
| 7.05 | Michael PittmanWR · PIT | WR | PIT | 9 | 77.2 | 71–85 | — | WRPosition PITTeam 9Bye 71–85Range —Signal | |
| 7.07 | Brian Thomas Jr.WR · JAX | WR | JAX | 7 | 78.5 | 61–90 | — | WRPosition JAXTeam 7Bye 61–90Range —Signal | |
| 7.07 | Carnell TateWR · TEN | WR | TEN | 9 | 79 | 71–95 | — | WRPosition TENTeam 9Bye 71–95Range —Signal | |
| 7.09 | Jayden DanielsQB · WAS | QB | WAS | 7 | 80.6 | 61–101 | — | QBPosition WASTeam 7Bye 61–101Range —Signal | |
| 8.01 | Jayden ReedWR · GB | WR | GB | 11 | 84.8 | 67–94 | — | WRPosition GBTeam 11Bye 67–94Range —Signal | |
| 8.02 | J.K. DobbinsRB · DEN | RB | DEN | 10 | 85.9 | 72–102 | Value | RBPosition DENTeam 10Bye 72–102Range ValueSignal | |
| 8.03 | Denver BroncosDEF · DEN | DEF | DEN | 10 | 86.9 | 80–92 | · | DEFPosition DENTeam 10Bye 80–92Range · not enough dataSignal | |
| 8.04 | Wan'Dale RobinsonWR · TEN | WR | TEN | 9 | 88.4 | 65–98 | — | WRPosition TENTeam 9Bye 65–98Range —Signal | |
| 8.05 | Trevor LawrenceQB · JAX | QB | JAX | 7 | 89.2 | 64–114 | Reach | QBPosition JAXTeam 7Bye 64–114Range ReachSignal | |
| 8.08 | RJ HarveyRB · DEN | RB | DEN | 10 | 91.8 | 73–113 | Value | RBPosition DENTeam 10Bye 73–113Range ValueSignal | |
| 8.10 | Quentin JohnstonWR · LAC | WR | LAC | 7 | 93.8 | 84–102 | Reach | WRPosition LACTeam 7Bye 84–102Range ReachSignal | |
| 8.10 | Josh DownsWR · IND | WR | IND | 13 | 94.2 | 77–103 | — | WRPosition INDTeam 13Bye 77–103Range —Signal | |
| 8.11 | Jordan AddisonWR · MIN | WR | MIN | 6 | 94.6 | 87–108 | — | WRPosition MINTeam 6Bye 87–108Range —Signal | |
| 8.11 | Khalil ShakirWR · BUF | WR | BUF | 7 | 94.7 | 72–102 | — | WRPosition BUFTeam 7Bye 72–102Range —Signal | |
| 8.11 | Jonathon BrooksRB · CAR | RB | CAR | 5 | 95.2 | 73–103 | Value | RBPosition CARTeam 5Bye 73–103Range ValueSignal | |
| 8.12 | Aaron JonesRB · MIN | RB | MIN | 6 | 95.5 | 73–111 | Value | RBPosition MINTeam 6Bye 73–111Range ValueSignal | |
| 9.01 | Jakobi MeyersWR · JAX | WR | JAX | 7 | 97 | 96–98 | — | WRPosition JAXTeam 7Bye 96–98Range —Signal | |
| 9.01 | Kenny GainwellRB · TB | RB | TB | 10 | 97.2 | 85–115 | Value | RBPosition TBTeam 10Bye 85–115Range ValueSignal | |
| 9.02 | Stefon DiggsWR · WAS | WR | WAS | 7 | 97.9 | 77–108 | — | WRPosition WASTeam 7Bye 77–108Range —Signal | |
| 9.04 | Los Angeles RamsDEF · LAR | DEF | LAR | 11 | 100.4 | 81–126 | · | DEFPosition LARTeam 11Bye 81–126Range · not enough dataSignal | |
| 9.06 | Jacory Croskey-MerrittRB · WAS | RB | WAS | 7 | 101.7 | 61–125 | Value | RBPosition WASTeam 7Bye 61–125Range ValueSignal | |
| 9.06 | Xavier WorthyWR · KC | WR | KC | 5 | 102.3 | 96–109 | Reach | WRPosition KCTeam 5Bye 96–109Range ReachSignal | |
| 9.06 | Jared GoffQB · DET | QB | DET | 6 | 102.4 | 88–118 | Reach | QBPosition DETTeam 6Bye 88–118Range ReachSignal | |
| 9.06 | Romeo DoubsWR · NE | WR | NE | 11 | 102.4 | 90–112 | Reach | WRPosition NETeam 11Bye 90–112Range ReachSignal | |
| 9.12 | Patrick MahomesQB · KC | QB | KC | 5 | 107.8 | 97–117 | — | QBPosition KCTeam 5Bye 97–117Range —Signal | |
| 10.03 | Deebo Samuel Sr.WR · SF | WR | SF | 8 | 110.6 | 87–126 | — | WRPosition SFTeam 8Bye 87–126Range —Signal | |
| 10.03 | Tucker KraftTE · GB | TE | GB | 11 | 110.7 | 94–147 | — | TEPosition GBTeam 11Bye 94–147Range —Signal | |
| 10.03 | Justin HerbertQB · LAC | QB | LAC | 7 | 111.1 | 102–119 | — | QBPosition LACTeam 7Bye 102–119Range —Signal | |
| 10.04 | Jordan MasonRB · MIN | RB | MIN | 6 | 112 | 97–131 | Value | RBPosition MINTeam 6Bye 97–131Range ValueSignal | |
| 10.05 | Dallas GoedertTE · PHI | TE | PHI | 10 | 112.7 | 78–139 | — | TEPosition PHITeam 10Bye 78–139Range —Signal | |
| 10.06 | MarShawn LloydRB · GB | RB | GB | 11 | 114.3 | 78–141 | Value | RBPosition GBTeam 11Bye 78–141Range ValueSignal | |
| 10.10 | Jalen CokerWR · CAR | WR | CAR | 5 | 117.8 | 112–126 | — | WRPosition CARTeam 5Bye 112–126Range —Signal | |
| 10.10 | KC ConcepcionWR · CLE | WR | CLE | 11 | 118 | 101–126 | — | WRPosition CLETeam 11Bye 101–126Range —Signal | |
| 10.10 | Bo NixQB · DEN | QB | DEN | 10 | 118.2 | 115–121 | — | QBPosition DENTeam 10Bye 115–121Range —Signal | |
| 11.01 | Brandon AubreyK · DAL | K | DAL | 14 | 120.9 | 40–157 | · | KPosition DALTeam 14Bye 40–157Range · not enough dataSignal | |
| 11.03 | Jaxson DartQB · NYG | QB | NYG | 8 | 122.7 | 98–141 | — | QBPosition NYGTeam 8Bye 98–141Range —Signal | |
| 11.05 | Baker MayfieldQB · TB | QB | TB | 10 | 125.3 | 120–133 | — | QBPosition TBTeam 10Bye 120–133Range —Signal | |
| 11.06 | Josh JacobsRB · GB | RB | GB | 11 | 126.2 | 108–145 | Value | RBPosition GBTeam 11Bye 108–145Range ValueSignal | |
| 11.06 | Blake CorumRB · LAR | RB | LAR | 11 | 126.3 | 97–142 | Value | RBPosition LARTeam 11Bye 97–142Range ValueSignal | |
| 11.10 | Mark AndrewsTE · BAL | TE | BAL | 13 | 129.8 | 109–148 | — | TEPosition BALTeam 13Bye 109–148Range —Signal | |
| 11.11 | Kyler MurrayQB · MIN | QB | MIN | 6 | 131 | 109–143 | — | QBPosition MINTeam 6Bye 109–143Range —Signal | |
| 11.12 | Tre TuckerWR · LV | WR | LV | 13 | 132.1 | 120–145 | — | WRPosition LVTeam 13Bye 120–145Range —Signal | |
| 12.05 | Makai LemonWR · PHI | WR | PHI | 10 | 137 | 127–143 | — | WRPosition PHITeam 10Bye 127–143Range —Signal | |
| 12.06 | Jacksonville JaguarsDEF · JAX | DEF | JAX | 7 | 137.8 | 132–149 | · | DEFPosition JAXTeam 7Bye 132–149Range · not enough dataSignal | |
| 12.11 | Zach CharbonnetRB · SEA | RB | SEA | 11 | 143.4 | 127–164 | — | RBPosition SEATeam 11Bye 127–164Range —Signal | |
| 12.12 | Isaiah LikelyTE · NYG | TE | NYG | 8 | 143.7 | 117–166 | — | TEPosition NYGTeam 8Bye 117–166Range —Signal | |
| 13.02 | Jake FergusonTE · DAL | TE | DAL | 14 | 146 | 133–157 | — | TEPosition DALTeam 14Bye 133–157Range —Signal | |
| 13.04 | San Francisco 49ersDEF · SF | DEF | SF | 8 | 147.7 | 120–169 | · | DEFPosition SFTeam 8Bye 120–169Range · not enough dataSignal | |
| 13.08 | Pittsburgh SteelersDEF · PIT | DEF | PIT | 9 | 151.6 | 132–172 | · | DEFPosition PITTeam 9Bye 132–172Range · not enough dataSignal | |
| 13.10 | Jauan JenningsWR · MIN | WR | MIN | 6 | 154.4 | 150–157 | — | WRPosition MINTeam 6Bye 150–157Range —Signal | |
| 14.04 | Kaelon BlackRB · SF | RB | SF | 8 | 160.2 | 143–169 | — | RBPosition SFTeam 8Bye 143–169Range —Signal |


Field guide
Using ADP without being used by it
You are two picks away, the player you wanted is gone, and the next name on your list has an ADP of 5.02. That reads round 5, pick 2, a price rather than a ranking. It tells you how long you can safely wait before taking him. Reaching one round early for a player you love costs almost nothing. Reaching three rounds early costs you a real starter.
What the Signal column flags
The board above is average draft position from real drafts run this week, refreshed daily through draft season, with the number of drafts printed under the title. The Signal column sets that draft position against our own projected value and flags where the two disagree. A Value tag means the projections rate him a dozen or more spots better than the room is taking him. A Reach tag means the room is a dozen or more spots ahead.
Read the rest
Read the rest
Reading a dash or a dot
Neither tag is a command. The projected value behind them is the points a player adds over a replacement-level starter, the same number behind the Rankings board and Trade Analyzer. Injuries, camp news and your roster shape still matter. A dash (—) means we compared the two and they already roughly agree; a dot (·) means we couldn't compare them at all for that player, missing our value or a market ADP.
The Range column is your panic meter
The Range column (earliest–latest pick) is your panic meter: a tight range means the room agrees and he won't fall; a wide one means you can probably wait a round. Pair this page with the Rankings board, take the same tiers to the table as a printable cheat sheet, and test any pick-for-player swap in the Trade Analyzer. Before you settle a tie between two late picks, check the strength of schedule and bye weeks so two starters don't sit the same week.
If your league carries keepers, run each one through the keeper value calculator before you print anything. A player kept in round three costs a different pick from slot one than from slot 12, and the calculator prices that pick from the same average draft position data as this board.